By: Josiah Huckins - 8/5/2024
minute read
This is the second concluding post in a series on self-hosted alternatives to Google Photos or iCloud Photos. This post will detail the setup of Immich, reusing much of the setup from part 1.
Disclaimer, the setup below has been tested and proven to work without data loss to the source files. However, as with anything involving file syncs and shares, I highly advise you to backup your photos to a separate location (at least temporarily) before proceeding with the steps below. With that out of the way, let's get to it!What we're setting up.
Immich is an "self-hosted photo and video management solution". It's has many features, including image and video transcoding to make your assets usable across devices, metadata extraction, RAW support, OAuth support, and most notably, external library support. It's a very active project that continues to improve. You can see the full list of features and track updates here.Overall Architecture

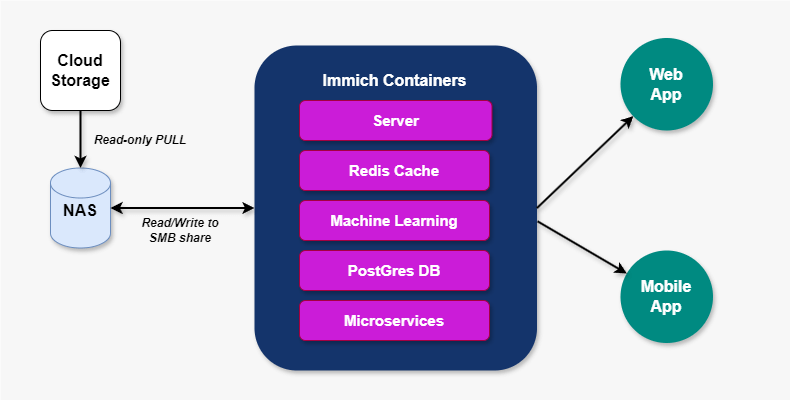
This solution requires cloud storage for your original files. The primary purpose of this is as a dependable backup, not for processing files or viewing on devices. (Having your library in cloud storage is highly preferred to adhere to a safe 3-2-1 backup pattern, where you have the library in the cloud, on your NAS and an external drive.) It also requires 2 machines, one to process assets and one providing a NAS (network attached storage). In part 1, we covered the setup of a NAS so we'll skip that for this post.
I set up Immich on a Windows PC, however this works well on Linux as well. I had built a PC with these specs for another purpose but it now serves a dual role, one of which being my Immich service. I mention this to say you'll definitely want a CPU with a base clock above 3GHz and a GPU with a few hundred cores or more to use Immich hardware acceleration.
I tested this on a Raspberry Pi 5 for a few weeks and it was not worth the effort, the pi is well suited for many things, but it just doesn't have the processing power needed for this. Once I connected Immich with the assets in my NAS, I ran into issues with high latency in job execution. More critical than that was the high latency in using the web app. It would often crash and/or take many minutes to load a response payload in the browser.
This was all due to my hardware, once setting up Immich on the PC mentioned above, every job and web app request has had low latency. It performs just as well, if not better than other more widely used photo service apps.
TrueNAS SMB
You'll want to enable an SMB share on the NAS via the following steps.1. In TrueNAS, go to Services and turn on SMB and set it to start automatically.

2. Go to Groups and setup a dedicated group for Immich. Enable Samba authentication for the group.

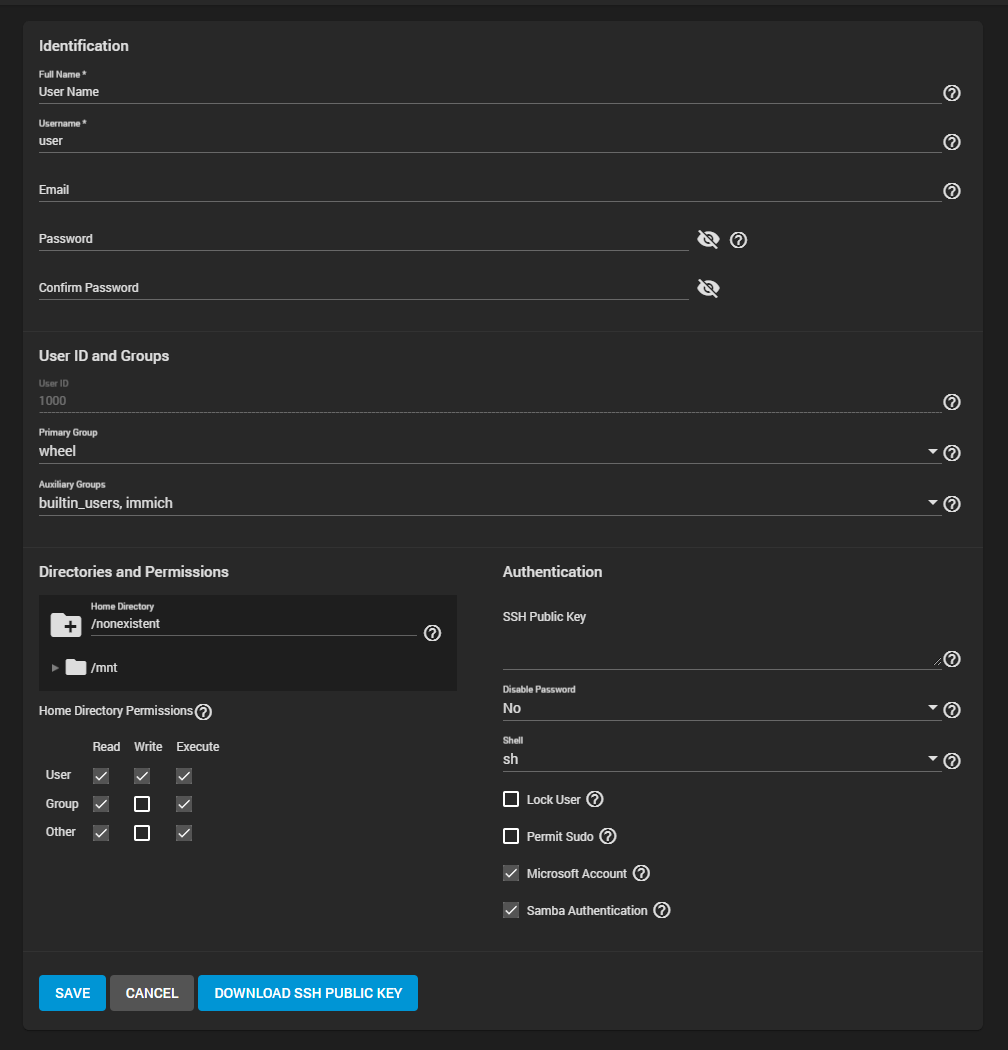
3. Go to Users and setup a user for SMB authentication. Be sure to configure this user with the settings below, in particular adding the user to the Immich group created in step 2. Remember the user credentials for later authentication.

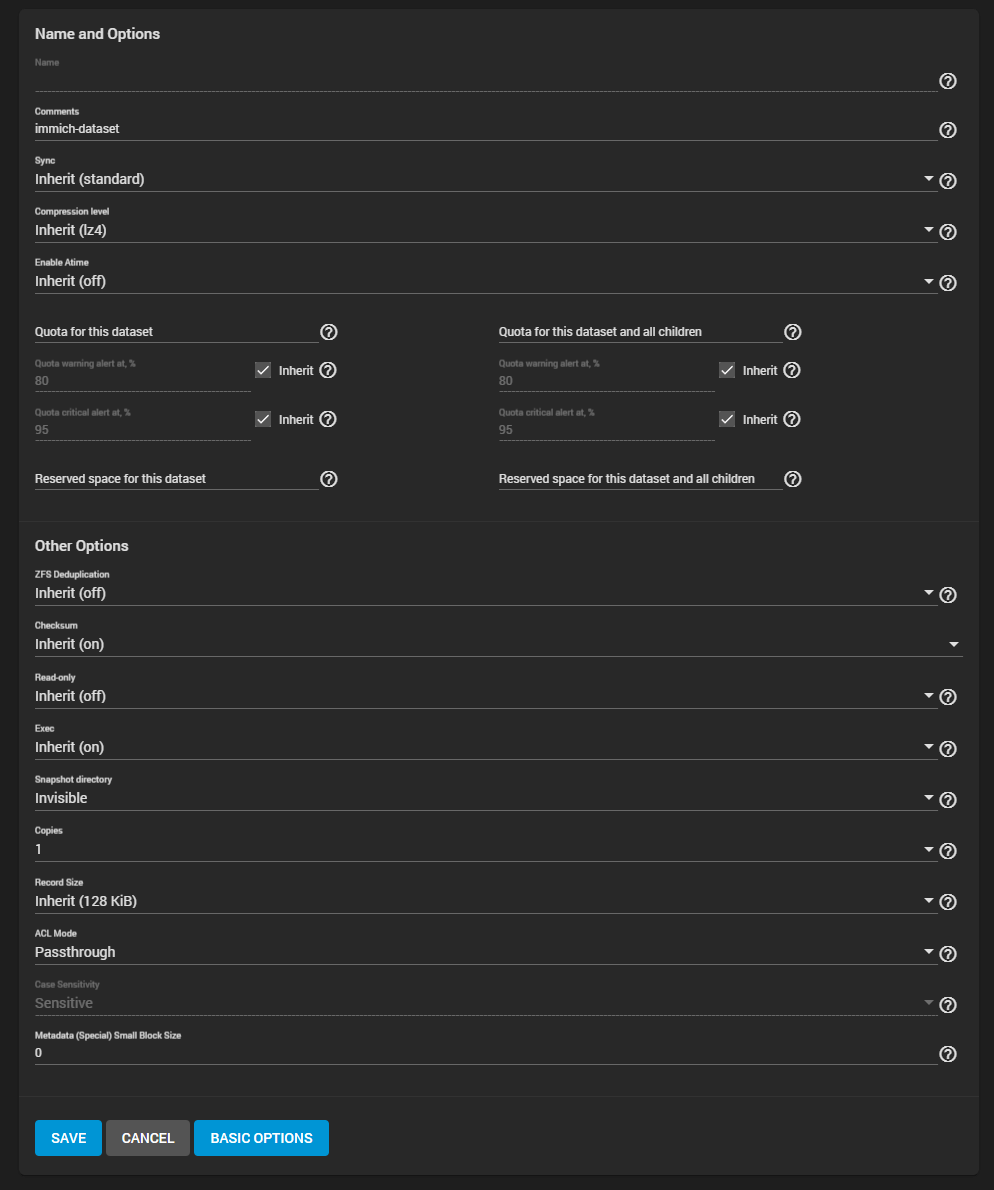
4. Go to Pools, and create an Immich pool.

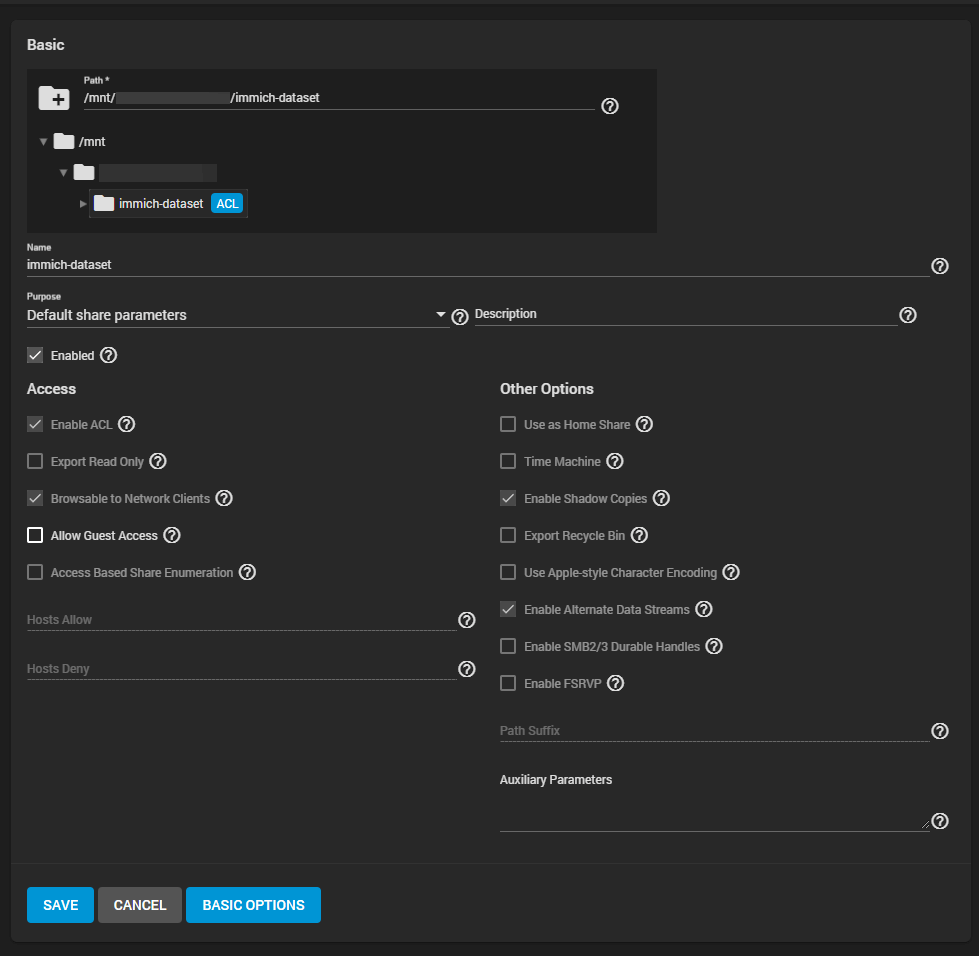
5. Finally, go to Sharing, and create an SMB share. Be sure to use the storage pool created in step 4.

Immich Install
With the NAS SMB share configured, its time to install Immich. Before we do that, ensure Docker Desktop (or the just the Docker runtime and Compose) is installed on your system.Then connect to the SMB share by mapping a network drive to \\TRUENAS\immich (replace the first part of that path with your TrueNAS system hostname if modified, replace the second part with the name of your immich share). You'll be prompted for your credentials
The Immich site details a number of different ways to install, but we'll use the recommended method and install via docker compose. I won't repeat the great documentation on their site. However take note that prior to running docker compose up -d, we need to include an EXTERNAL_LIBRARY variable in the .env file:
EXTERNAL_PATH=H://
The value should include the drive letter of the mapped drive you created. Also, in the docker-compose.yml file, replace - ${EXTERNAL_PATH}:/usr/src/app/external with - external-path:/usr/src/app/external
At the bottom of the file, add the following:
Replace the [USERNAME] and [PASSWORD] values with your TrueNAS SMB credentials. It's recommended to store the password in a secrets file and reference it from there instead of as plaintext in the docker-compose.yml. I leave that setup to you. For my use case, access to the machine is isolated in terms of network and system principals. The SMB share data is considered public. Replace TRUENAS with your NAS hostname if needed and replace immich with the name of your SMB share.
The external-path volume mapping is custom to our setup. This is necessary as we are sourcing our assets from an SMB share and is required to allow authentication from within the container. If you are using an NFS share (perhaps similar to the one detailed in part 1), you don't need this custom configuration. After this proceed on with the Immich install steps and run docker compose up -d
Once the containers are all in running status, go to your browser and nevigate to http://[IP address of Immich host machine]:2283.
You'll be prompted to create your admin user, select a theme, and setup storage templates (optional). When those steps are done, you should be able to login using your new admin account.
External Library
To enable use of the NAS SMB assets share, you'll need to configure an external library. The instructions linked here will have you configure the container's internal path mapped to the external-library volume defined above. After you invoke the "Scan New Library Files" process, you should see many tasks running under Jobs (in the Administration view). Be prepared to wait. This being the first time, processing the external library will take a while (hours), depending on the size of your library.It's best to let it bake for a few hours and return once you see all job types have 0 active and 0 waiting statuses. Note, this long period is for the first time ingestion of your assets library, individual asset ingestion takes seconds or less.
Sharing the External Library with other Immich Accounts
If you'll be using Immich as a family or group shared assets service, you can share the external library. To do so in the web app, click your user icon and then select Account Settings. In Account Settings, go to Partner Sharing. Add partners and they should be able to access your library once they enable it's view.Partners will need to go to Partner Sharing and enable the show in timeline option to see the external library's assets.
One limitation with sharing is that partners cannot delete assets. Depending on the use case, this is likely preferred. If you need to have one cohesive view of all assets in a family or group, with delete permission, you'll want to use a single account shared across devices. Using a 3-2-1 backup approach mitigates the risk involved in sharing delete and other privileges.
Using Your new Assets Service
At this point you will probably want to download the mobile app, configure additional users and start creating albums. For me, Immich flat out replaces a photo service I've been using for years that had very limited storage. I now have all the same features of the old service, with a much larger storage pool I can increase as needed, no subscription required. (In my case, the increased capacity is 22 times the amount of storage of the old service!) Be sure to checkout the features detailed on the Immich site, take particular note of backup options for the Immich database. On the mobile app, I've configured it for automatic uploads. All photos and videos shot with my phone's cameras are pushed to Immich.I love this project as it provides a solution for a very common need and empowers you to take control of your assets without being chained to a subscription. I hope to contribute to it at some point soon and encourage you to do likewise!
This concludes our series on personal cloud photo services. Be sure to come back for our other series, we'll have more guides and hints to expand your LAN!
