
By: Josiah Huckins - 4/10/2025
minute read
It's been a while since I shared a guide for setting up your own server cluster. I still stand by the approach defined back then, as it's an inexpensive and accessible way to create your own web service or blog. An unfortunate fact of life is that any hardware eventually degrades and needs to be replaced.
Don't let these truths get you down (Read on, I have a solution!): Heat generation from regular use and increased capacitor resistance over time (leading to improper voltage across a circuit) cause degraded performance. Check out this article on capacitor resistance if you're curious. Mass storage devices will degrade, resulting in increased read time and errors. It's not a question of if, but when will you need to buy new machines?
In IT, operations and engineering, the time until a piece of hardware is likely to fail can be measured using the mean time between failures. Mean time between failure (MTBF) is a measure of the reliability of a system or component. MTBF is calculated by dividing the total time of operation by the number of failures that occur within that time. This results in an average value that can be used to estimate the expected service lifespan of the system or component. It's important and somewhat oddly comforting to be able to calculate a likely time range for when devices need to be replaced.
I've recently been reminded of all of this when doing reviews and maintenance on this blog.
Degradation discoveries.
I started noticing severe latency in render times, for content that was once near a 200ms load time. My first thought was to optimize, so I started refactoring key javascript and backend service scripts to reduce execution time. I toyed with cache TTLs and image compression. After much tuning over a few weeks, I started to realize the issue was with physical hardware.I had originally planned to just swap out pis with new versions. There are claims that the pi5 has a 3x performance boost over the pi4, it would be a great upgrade path. However, configuring new pis would require a lot of manual work as I would want to start with a fresh image. I didn't provision configurations using Ansible or a similar tool, so it would all be manual work. I wanted a new approach, one which would reduce manual configuration now and in the future.
I started formulating a better solution, one that didn't require pis (don't worry I'm still a big fan of them).
I went from hosting on-site to fully cloud hosted, but it's all still free.
The move to a single monolith and CDN.
I've recently been much more engaged in JAM (js, APIs and markup) stack projects. Using that as a model, I've moved from a pi cluster to a combination of one vertically scaled local machine and Cloudflare.The local machine is running a container, and serving as my content editor via code-server. It's used strictly for code and content creation and pushing updates to the CDN, it's not running any web server.
All tasks that my web servers once handled are now handled exclusively using Cloudflare workers.
This approach has simplified maintenance and allowed for a drastic reduction in load times for the site.
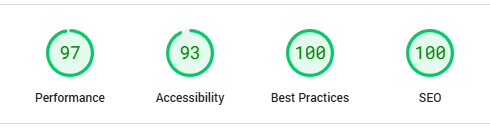
Site performance metrics such as total blocking time and first contentful paint are definitely key performance indicators for a web app. This new approach has kept those metrics at optimal values.
Following the steps below, you can setup a similar site and reap the benefits of serverless architecture!
Local Machine Configuration
I wanted to isolate the management and updates of the site and enable migration from/to whatever machine I have available, at any time.To accommodate this, I set up a lightweight container for management and code updates.
As this is not serving site traffic, any machine would be ideal for this, if you're sticking with pis, a single pi5 would be great. Also, you don't need Raspbian or another linux based OS on this machine, any OS that can run the Docker daemon and Docker compose would work.
Step 1: Install Docker
You'll need docker and docker compose. It's also a good idea to establish a dedicated folder for your container and place all configs within.
You may want to store this folder in cloud storage and sync it locally, so it's always backed up, avoiding the need for a custom backup solution.
Step 2: Dockerfile Configuration
My old setup had code-server on its own dedicated host. I also have a number of management scripts that were run on the pi cluster to support things like js/css minification, versioning and cache clearing.
I'm storing the scripts and site content together in a dedicated location (stored in and synced from cloud storage). The following Dockerfile consolidates the code-server configuration and these management scripts.
When run, this installs all needed packages and copies some local files into the container. I'm including nodejs packages for minification tasks and worker management, so nodejs and npm are installed. I'm also using cron to schedule sitemap updates and a daily CDN cache invalidation.
Code-server is configured to be listening on port 2333, so we're exposing that port along with some other ports for Cloudflare's worker management tool, wrangler. More on wrangler below.
I have a vscode folder in the same location where I'm storing the Dockerfile. Then in the Dockerfile, I'm including the vscode/config folder which contains a config.yaml. This file sets the port to the one we have configured for code-server and defines a password for accessing it.
Once the container is running, you will be able to access your code-server from the browser via https://localhost:2333.
Notice also, I'm including SSH keys to interact with a separate VM. You may not need this. I use it for prototyping and testing content updates in multiple browser contexts.
Pushing updates to Cloudflare via wrangler normally goes through a browser-based OAuth flow, where you allow the local wrangler tool access to update your worker in Cloudflare.
In our case, doing this from in the container breaks the flow as the callback URL is not reachable. So we define a CLOUDFLARE_API_TOKEN environment variable. The token value should be replaced with a Cloudflare API token created under your own account.
Cloudflare offers templates with predefined permissions.
You'll want to select the Edit Cloudflare Workers template. Edit permissions as you see fit, but note that you can always go back to edit them later.
You may also want to limit accounts, zones and clients who can use this token. This is highly recommended. I limited the zone to match the domain of this blog, this limits the scope of access to the single worker I setup for content.
If this were an enterprise project you would definitely want to store the token in docker secrets or via another secrets manager, then access it from there.
Step 3: Docker Compose configuration
The following docker compose file uses our Dockerfile to build a container.
Place this in the same directory as your Dockerfile.
To build and run the container in the background, from the folder containing your docker-compose.yml, use this command:
docker compose build && docker compose up -d
This will build your container and start it.
No Pi cluster, no problem
I knew that if I were to replace my cluster, the new solution would need to perform just as well and maintain high availability.Cloudflare Worker Setup
Cloudflare Workers are their serverless answer to Google's Cloud Run Functions or AWS Lambda. Each service is feature rich, but Cloudflare Workers stand out in that static asset requests are free. This means that for a site like this one, I can store the HTML, CSS and Javascript as static assets in a worker and handle any volume of requests for them without operational cost.
That's not even the best part, workers are available across the CDN's global network, which means my site is available globally. Note, this isn't just caching content, the site is deployed and served from their network of servers. I went from a cluster of 4 low powered mini servers to a global army of them!
The platform uses V8 isolates, which for a use case like mine is a much more efficient execution environment than competing options.
Ok, enough proving the merits of this solution, let's get to the worker setup.
In our Dockerfile, we're ensuring a /home/ubuntu/Projects/site directory is created. Then in our docker-compose we have a volume mounted via:
/path/to/cloud/storage/projects/site:/home/ubuntu/Projects/site
That cloud storage path might be OneDrive, Google Drive, Dropbox or any other provider. This allows us to edit our worker in and out of the container.
You can set up a worker from the command line or from Cloudflare's portal. We'll go with the CLI route.
You need to have a Cloudflare account (the free option will work for this), nodejs and npm installed.
We'll initialize our worker project in the site volume, so first run this command:
cd /path/to/cloud/storage/projects/site
Then you can setup your worker project by running:
npm create cloudflare@latest -- site-worker
When prompted, select the following options:
For What would you like to start with?, choose Hello World Starter.
For Which template would you like to use?, choose Worker + Assets.
For Which language do you want to use?, choose Typescript.
For Do you want to use git for version control?, choose Yes.
For Do you want to deploy your application?, choose No (we will be making some changes before deploying).
This will create a project with a number of directories, of importance are the src and public folders and a wrangler.jsonc file.
The src folder has an index.ts file. This file is the worker entrypoint and contains the main function executed when the worker is invoked.
The public folder contains an index.html file. This file is the default page returned when requesting the site domain without any sub path.
Site assets, scripts, stylesheets and pages can be added to this public folder. In my case I just copied everything from the web directory of one of my pi cluster web servers (all were being synced with each other so I only had to pick one) into the public folder. If you use relative paths, then you shouldn't need to make updates to this content in order for it to work from the public folder.
Back to index.ts, I'm using the following code:
This is all we need for the worker code to serve the site. With this the worker is accepting GET, HEAD or OPTIONS requests only. It responds with allowed methods if its an OPTIONS request, otherwise if the request method is GET it will attempt to serve the content from the public folder. If the request method is not one of the allowed ones, or there is an internal error it will serve a not-found page.
Notice also that this is using an assets binding. This allows access to our static assets in the public folder.
Last but not least is the worker configuration file wrangler.jsonc.
This file is where we define any Cloudflare service bindings we need, as well as define routes and the DNS zone.
The assets configuration is set to use the public directory. This could be changed, but be sure to update your index.ts and rename the folder if you do so.
Important note, the somedomain.com route in the sample above indicates that this worker handles all requests for somedomain.com and its sub paths. Replace this with your own domain.
The domain should be managed using Cloudflare DNS.
Once you have the worker, its content and wrangler configured as you like, run npm run deploy to deploy this to Cloudflare's network.
This will push the worker to your account for management from the Cloudflare portal. Changes via the portal should be rare unless you are using other Cloudflare tools/features. If you're exposing the worker project to your container via the /path/to/cloud/storage/projects/site:/home/ubuntu/Projects/site volume mentioned before, you can also deploy directly from code-server using the vscode built-in terminal.
You will need to add a DNS entry to map your site domain to your worker. This can easily be done by going to your worker settings in the portal and adding the domain as a custom domain:

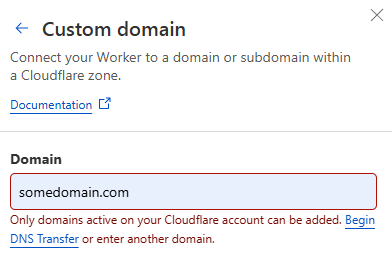
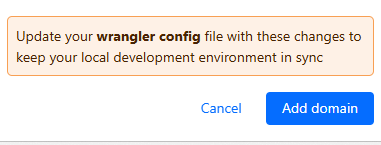
You could also do this for any subdomains that should redirect to your worker (www.somedomain.com).
If you followed all these steps, you now have a fiercely fast site, available across the globe, with its configurations and all content synced to cloud storage. As a bonus, local code management is a fully self contained and IaC driven setup.
We didn't touch on CI/CD processes to support this. I'd like to save that for another post.
Final Remarks
Having your site exclusively at the edge has many benefits. Decreased latency, maximized availability and a truly global deployment are certainly highlights. Automated autoscaling to meet any demand is another feature that makes this great. This approach won't work for every scenario, especially for content requiring authentication like personalized profiles or commerce apps. However if you just need to enable a site with HTML, javascript and CSS, it's great!This does require a lot of reliance and trust in the CDN. As long as you have backups you can always migrate to another platform or solution with few headaches. I for one plan to stick with this solution for a long time. The pi 4 cluster lasted 5 years, I hope to stick it out with workers for much longer...
...but don't hold me to that. 😏