By: Josiah Huckins - 3/28/2020
minute read
In this one, I'll detail how you can setup your very own Pi server farm.
This is the first of a multi-part series on Raspberry Pi projects.
Let's get started!
The goal of this project is to have a working cluster/team of Raspberry Pi servers, which can be used for various computing projects (more on this below). In this tutorial, the cluster will be setup with one central power source and can be isolated to it's own local network. As you'll see, you can substitute many of the materials in this project to suit your needs. This post is divided into 4 sections, skip around if needed.
Section 1: Assembly
Section 2: OS Setup
Section 3: Putting it all together
Section 4: Uses for your Cluster
Supplies Needed
You're going to need the following items to build out the hardware:| Item | Amount Needed | Cost Per Unit | Total Cost | Where to Buy |
|---|---|---|---|---|
| CPU Heatsinks | 4 | $10.99 | $10.99 | Amazon |
| GPIO Stacking Header | 4 | $3.00 | $10.00 | Digi-Key |
| Board-to-Board Connector | 4 | $1.28 | $5.12 | Newark |
| 15mm stand-offs | 16 | $12.99 | $12.99 | Amazon |
| MicroSDXC Memory Card (32GB) | 4 | $7.49 | $29.96 | Amazon |
| Cloudlet Case | 1 | $59.99 | $59.99 | Amazon |
| Cat6 Cabling (6") | 4 | $15.49 | $15.49 | Amazon |
| 5-port (4 PoE), unmanaged network switch | 1 | $49.99 | $49.99 | Amazon |
| Raspberry Pi PoE HAT | 4 | $20.00 | $80.00 | CanaKit |
| Raspberry Pi (4GB variant) | 4 | $55.00 | $220 | CanaKit |
Note, you can build out a smaller 2 or 3 node cluster if you need to save a few bucks. Doing so would allow you to reduce the number of PoE HATs, onboard connectors and SD cards needed as well. For this tutorial, we are going with a 4 node setup. Following my build to the letter would cost you approximately $505.52, though if you start out smaller you can save and expand the build later on. Personally, I see this as a cost saving project (more on that below).
The cloudlet case itself is stackable. Given a switch with the right number of ports, you could have many more nodes in your cluster! Alright, let's get started building!
Section 1: Assembly
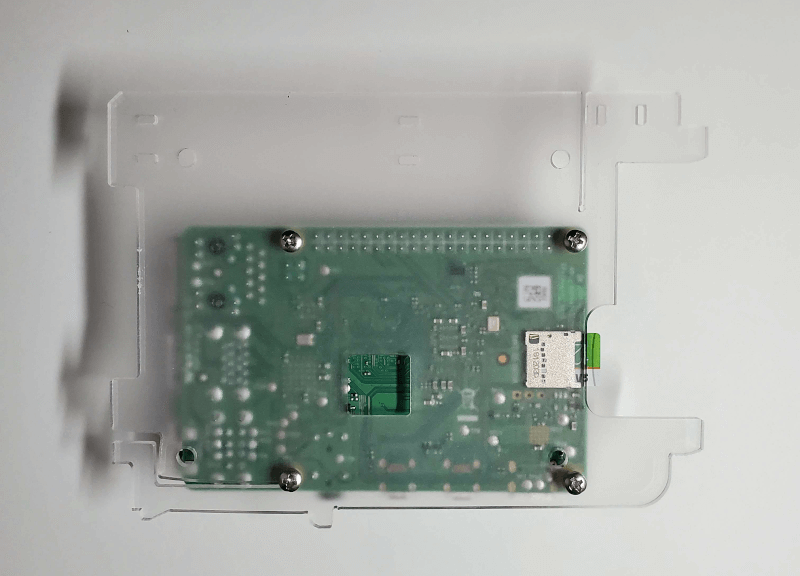
The Cloudlet case has the pis installed via acrylic plates that snap into place:
Step 1: - Remove the protective paper from the plate.
Step 2: - The Cloudlet case instructions suggest fastening the screws through the pi's mounting holes from the top, however to allow for using both a PoE HAT and the GPIO pins, we will make a slight adjustment.
Note: The pi's onboard peripherals and ICs have solder on the underside of the board. This means that there should be a gap of about 3mm between the plate and the bottom of the pi. The Cloudlet case comes with 3mm insert nuts which can be used for this.
Fasten a 2.5 x 10mm screw (included with case) from the bottom, through the acrylic plate, into an insert nut and finally into the pi's four mounting holes:

PoE Installation
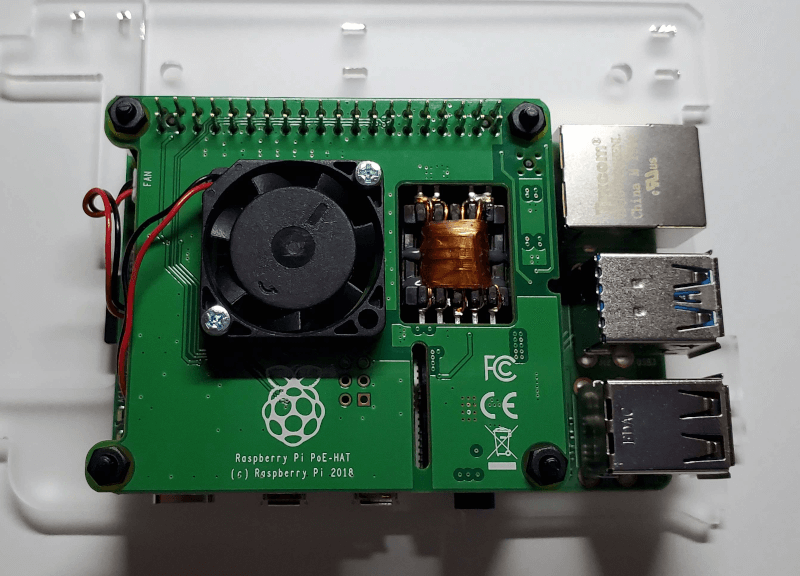
The Cloudlet case has 50mm x 50mm fans which are powered via the Pi's GPIO header. To allow access to the GPIO header, we need to connect a Stacking Header and Board-to-Board Connector: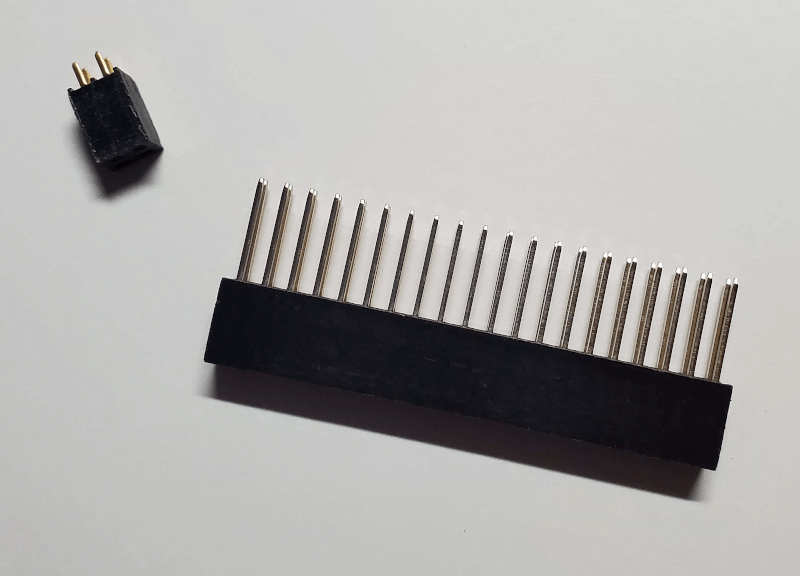
Step 1: - Attach these headers onto the 2x20 GPIO header and the 2x2 headers where appropriate. The GPIO header can be attached with some force, but be careful as its very easy to bend the pins.
While you're at it, go ahead and install a heatsink on the ARM chip and memory chip.
The locations of the pins are marked in red below. The chips are marked in orange:
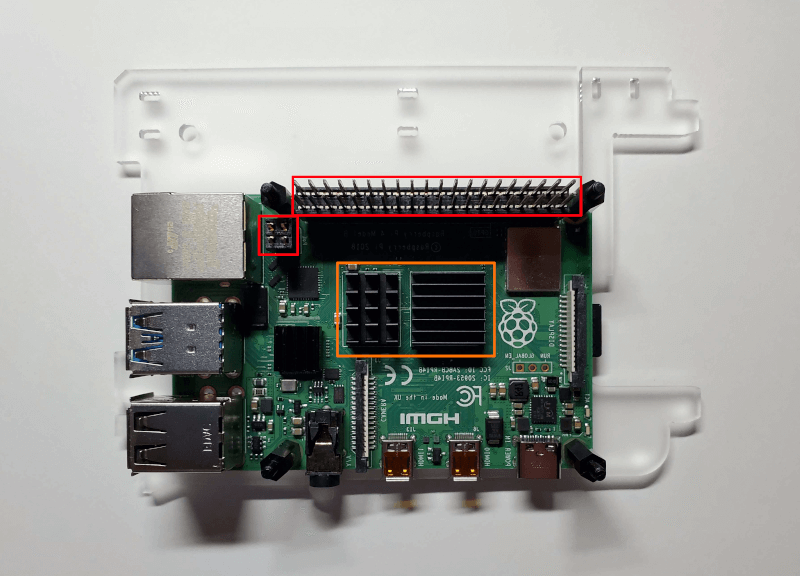
In the image above, notice also the 15mm stand-offs. You will need to attach 1 stand-off to each of the screws keeping the pi attached to the plate.
Note, in the parts list above, the stand-offs come in sets of 15 each. If you're building out a cluster of 4 nodes (or more), you may need to order more stand-offs. Alternatively, the pack comes with longer 18, 20 and 22mm stand-offs. These are nylon plastic. You could easily cut and sand down the longer stand-offs to make them the required 15mm in length. (I did this for node 4.)
Step 2: - At this point, you can install the PoE HAT onto the pi. Take care to ensure it fits snugly over the exposed pins. The GPIO pins will go through the HAT and are exposed on top.
The HAT should sit on top of the stand-offs. To secure it in place, attach the M2.5 nylon nuts (included with the stand-offs package) to the threaded ends of the stand-offs.
With that, the node hardware build-out is complete. Repeat the above for each node in your setup.
We'll be putting the built nodes into the case in Section 3.
Section 2: OS Setup
What you plan to do with your cluster will determine the type of OS needed. In my case, I wanted a set of servers with no GUI overhead, keeping GPU horsepower focused to other tasks.I installed the Raspbian Buster Lite image onto the SD cards for my nodes. Raspbian comes in other flavors which include desktop environments. Ubuntu is also an option.
Starting with the first pi, write the image you choose to the SD card using Etcher or the new Raspberry Pi Imager. Then insert the SD card into the pi. For the initial setup, connect your node to a keyboard, mouse and monitor and turn it on. If imaging was successful you should see a login prompt or desktop.
Initial Network Setup
Most of the time, you'll be communicating with the nodes using the ubiquitous IP network layer protocol. Numerous apps and services will require a static IP for best results. In Debian based linux distros like Raspbian, you can configure a static IP address via the /etc/network/interfaces file.Step 1: - Open the file as root and enter information similar to:
The
iface eth0 inet static line ensures that the IP network address bound to the ethernet interface is static. While the pi 4 does have built-in WiFI support, we are using a network switch to allow our nodes to communicate. (If you're following this tutorial exactly, it's also providing power to the nodes. So its kind of important.)
Step 2: - Restart the network stack to apply the changes via:
sudo service networking restart.
OS Security
No matter which OS or firmware you choose, you'll definitely want to secure it.There are some important suggestions for this, notably:
- Change the default pi account password.
- Setup a new user account and disable the default pi account.
- Change the root account default password.
- Audit your sudoers file to limit actions/commands that can be run via sudo.
- Prevent SSH access using the root account.
- Audit and use only required services.
- Use non-standard SSH server ports.
- Use public-key authentication and disable SSH passwords.
- Limit the number of SSH login attempts and user accounts who can authenticate.
- Prevent brute-force password guessing with a tool like Fail2Ban.
- Install a firewall.
- Keep the OS up to date on security patches and related fixes.
Security is a broad topic, and its up to you to determine which aspects of it are crucial for your servers. I have multiple layers of security encompassing my pi cluster which go beyond the OS and software. I recommend a similar strategy.
At this point you should have a node with an OS installed, networking configured and preferably some secure configurations in place. Repeat the OS Setup steps above for the rest of the nodes.
Astute readers may suggest cloning the first SD card to the rest of the SD cards via dd or another utility. If doing so, take care to unmount any of the target cards' mounted partitions prior to cloning.
Section 3: Putting it all together
Step 1: - Install the Cloudlet case's fans and optional side panels.Each pi node you've setup can snap into place via the notches on the acrylic plates.
Step 2: - Install the first node in the first slot. Then on the GPIO header, connect the nearest fan's red wire to pin 4 and it's black wire to pin 6.
Repeat the two steps above for the rest of the nodes, skipping a slot for each install. (Unfortunately, there is not enough room in the case to use all 8 slots, allow for a single power source, and allow the 4 fans to be powered via GPIO pins. One source of power and device cooling are more important to me than the number of nodes.)
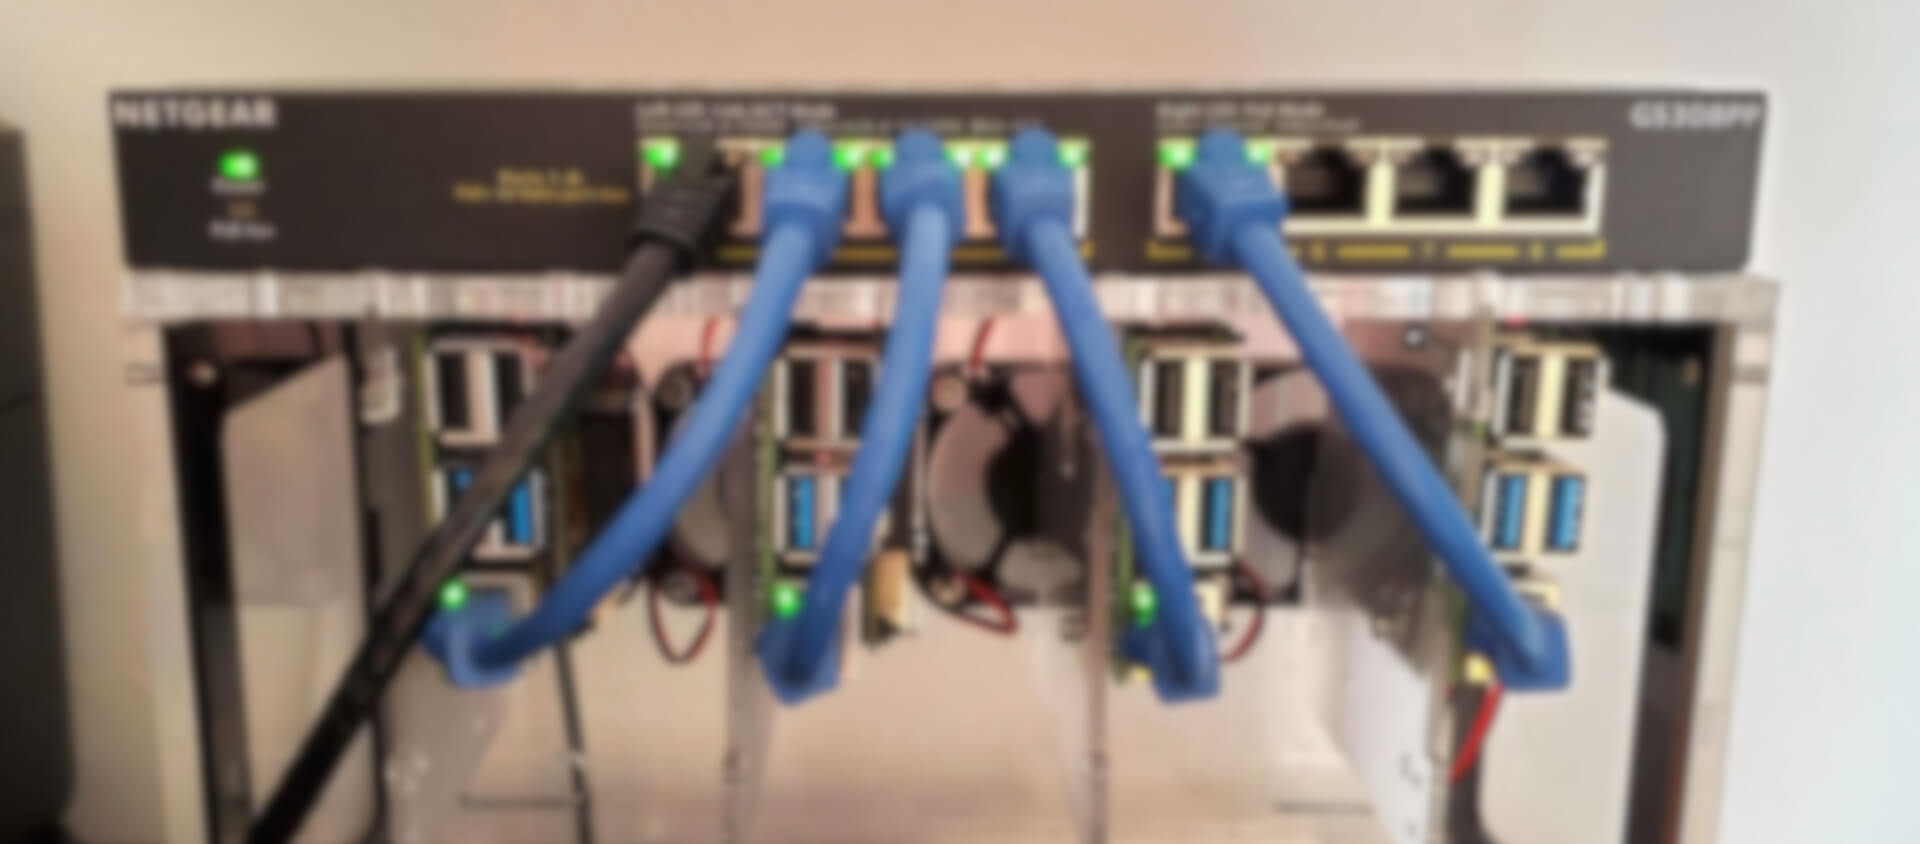
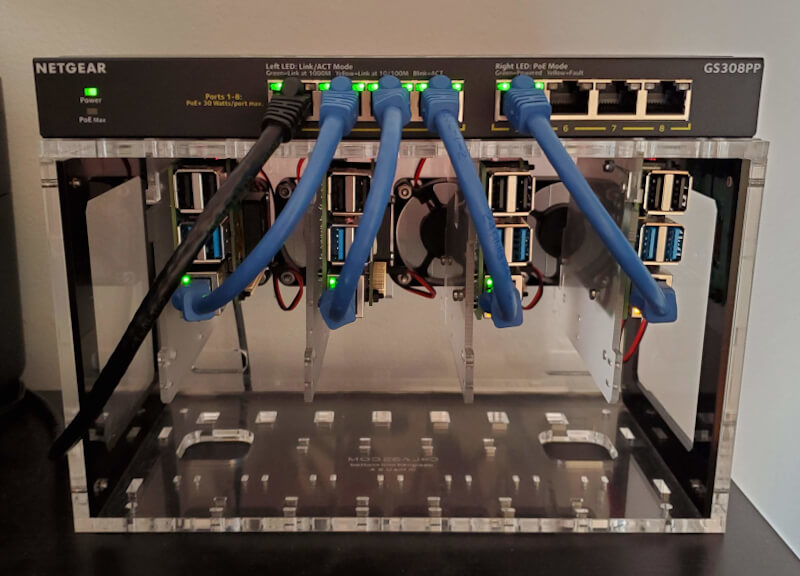
Step 3: - Put the network switch either on top of the case or in the case underneath the nodes. Then connect it to a power source.
Step 4: - Connect a CAT6 cable from the ethernet port on each pi to ports 1 through 4 on the switch. Then connect the switch to the rest of your network via port 5.
If you've made it this far, congratulations!
You now have a networked cluster of tiny servers, ready to do your bidding!
Section 4: Uses for your Cluster
When it comes to what you can do with a pi cluster, you're really only limited by imagination. While this is no supercomputer, its definitely a very flexible compute unit.
I'm currently using my setup to host this blog! I was able to migrate away from a $120 per year, low powered, single server VPS hosting plan. This makes the initial $505.52 build cost worth it in the long term. Now, I have multiple servers hosting my site, for a one time hardware cost. I'm planning to expand usage to include GPU rendering experiments with Blender, C++ compilation offload, and container application development via Kubernetes.
This can be thought of as a mini datacenter. On that note, maybe you'll use it to experiment with cloud services concepts like CPU bursting or fault tolerance.
You might use yours to provide your own email and calendar apps, an internal chat app or something new.
These ideas merely scratch the surface of the potential and the list goes on and on. I would love to hear about how you're using your pi cluster. Share in the comments!
I'll have more posts about cluster projects and other SBC projects in the future. I do hope you come back for that.
Thanks for reading!